
- Pentalobe screwdriver
- Phillips screwdriver
- Metal spatula
- Plastic spatula
- Suction cup
Preface
Use the following picture guide to easily change the display on your iPhone & and iPhone & Plus. Make sure that you install the home button from your old display into the new one. Without your original home button, the fingerprint sensor with touch ID will not work.
You should make a backup of your iPhone before changing the display and then turn it off.
Step 1: Remove Pentalobe screws

Step 2: Open display

If using a single suction handle, apply it to the bottom edge of the phone, while avoiding the curved portion of the glass.
If your display is badly cracked, covering it with a layer of clear packing tape may allow the suction cup to adhere. Alternatively, very strong tape may be used instead of the suction cup. If all else fails, you can superglue the suction cup to the broken screen.
Step 3: Detach display from frame

Pull up on the suction cup with firm, constant pressure to create a slight gap between the front panel and rear case.
Insert an opening pick into the gap.
The watertight adhesive holding the display in place is very strong; creating this initial gap takes a significant amount of force. If you're having a hard time opening a gap, apply more heat, and gently rock the screen up and down to weaken the adhesive until you create enough of a gap to insert your tool.

Slide the opening pick around the lower left corner and up the left edge of the iPhone, slicing through the adhesive holding the display in place.
Don't insert the opening pick too far into the iPhone, or you may cause damage to internal components.

Re-insert your pick at the bottom edge of the iPhone, and slide it up the right side to continue separating the adhesive.
Don't insert the pick very far, or you may damage the display cables along this side of the iPhone. Insert it only a few millimeters, or about the width of the display bezel.

The top edge of the display is secured with both glue and clips.
Slide the opening pick around the top corner of the display, while gently pulling or wiggling the display down in the direction of the Lightning port.
The clips will break if you use too much force. Work carefully and be patient.
Again, don't insert the pick more than a few millimeters—about the width of the display bezel—or you may damage the front panel sensor array.
Slide the pick to the opposite corner and cut any remaining adhesive securing the display.


Open the iPhone by swinging the display up from the left side, like the back cover of a book.
Don't try to fully separate the display yet, as several fragile ribbon cables still connect it to the iPhone's logic board.
Lean the display against something to keep it propped up while you're working on the phone.
During reassembly, lay the display in position, align the clips along the top edge, and carefully press the top edge into place before snapping the rest of the display down. If it doesn't click easily into place, check the condition of the clips around the perimeter of the display and make sure they aren't bent.
Step 4: Remove cover

Remove four Y000 screws securing the logic board cover bracket, of the following lengths:
Two 1.1 mm screws
One 1.5 mm screw
One 3.7 mm screw
Throughout this repair, keep track of each screw and make sure it goes back exactly where it came from to avoid damaging your iPhone.

Remove the three Y000 screws securing the display connector bracket:
Two 1.1 mm screws
One 1.5 mm screw
Step 5: Detach connectors

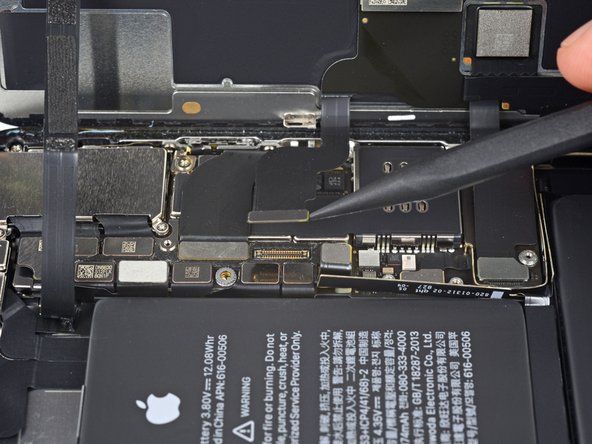
Use the point of a spudger or a fingernail to disconnect the OLED panel cable connector.
To re-attach press connectors like this one, carefully align and press down on one side until it clicks into place, then repeat on the other side. Do not press down on the middle. If the connector is misaligned, the pins can bend, causing permanent damage.

Use the point of a spudger to pry the digitizer cable connector up from its socket.
This connector's recessed location makes it tricky to reconnect. Take your time and align it carefully, then gently press it into place with your fingertip—first one side, then the other. You should feel it click into place.
If any part of your screen doesn't respond to touch after your repair, disconnect the battery and then re-seat this connector, making sure it clicks fully into place and that there's no dust or other obstruction in the socket.

The front panel sensor assembly flex cable is lightly adhered in place.
Carefully lift the cable until the adhesive separates.

Step 6: Remove earpiece speaker and front sensor assembly

Remove the three Y000 screws securing the speaker/sensor assembly:
One 1.4 mm screw
Two 1.5 mm screws


The earpiece speaker is lightly adhered in place.
Using a spudger, gently pry under the top edge of the speaker assembly, and flip it over—down and away from the top edge of the display.
The speaker remains attached via a very thin flex cable. Be careful not to strain or damage the cable.

Carefully slide the edge of an opening pick underneath the flex cable below the microphone.
Twist gently to separate the microphone, while being careful not to strain or damage the flex cable.
If needed, use the point of the spudger to finish separating the microphone from its notch in the front panel. If the microphone remains difficult to separate, apply more heat.


Working left to right, slide an opening pick beneath the flex cable and underneath the proximity sensor + flood illuminator module.
Gently wiggle and lift to separate the module from its notch in the front panel.
It's helpful to lift and hold the speaker out of the way for access. Just be careful not to pull on the thin flex cable while you work.

Use tweezers to wiggle the ambient light sensor and lift it from its notch in the display.
If the sensor does not wiggle free after a few seconds, apply more heat and try again.
The sensor remains attached to the rest of the sensor assembly via a very thin flex cable. Be careful not to strain or damage the cable.


If you successfully removed the entire ambient light sensor, as shown in the first photo, continue to the next step below.
If the white diffuser strip detached and remains embedded in the display, as shown in the second photo, you will need to carefully lever it out along the top edge using a thin blade or pry tool. Re-applying heat first may make this task a bit easier.
During reassembly, install the diffuser into the display first, making sure it faces the right direction (the front-facing side is shown in the first image, and the rear-facing side is shown in the third).
Then, set the ambient light sensor on top of the diffuser. You will need to hold the sensor in position while installing the screws securing the earpiece/sensor assembly. Once the screws are tightened, the sensor will stay in place and work normally.


During reassembly, check the position of the black plastic module containing these components:
Proximity sensor
Flood illuminator
The module must be positioned so that these components are not obstructed by any adhesive.