
- Pentalobe screwdriver
- Phillips screwdriver
- Metal spatula
- Plastic spatula
- Suction cup
Preface
Use the following picture guide to easily change the display on your iPhone & and iPhone & Plus. Make sure that you install the home button from your old display into the new one. Without your original home button, the fingerprint sensor with touch ID will not work.
You should make a backup of your iPhone before changing the display and then turn it off.
Step 1: Remove Pentalobe screws

Remove the two Pentalobe screws on the bottom of the iPhone.
Step 2: Open display

Lift the screen out of the frame using either the suction cup or the thin metal spatula Which of the two you will use depends largely on the state of your screen. If it’s still mostly uncracked, the suction cup will work just fine.
Step 3: Detach display from frame

While holding the iPhone down with one hand, pull up on the suction cup to slightly separate the front panel assembly from the rear case.
Take your time and apply firm, constant force. The display assembly is a much tighter fit than most devices.
Using a plastic opening tool, begin to gently pry the rear case down, away from the display assembly, while continuing to pull up with the suction cup.
There are several clips attaching the front panel assembly to the rear case, so you may need to use a combination of the suction cup and plastic opening tool to free the front panel assembly.
Step 4: Remove cover

Open the screen just enough so you are able to reach these five screws securing the metal cover.
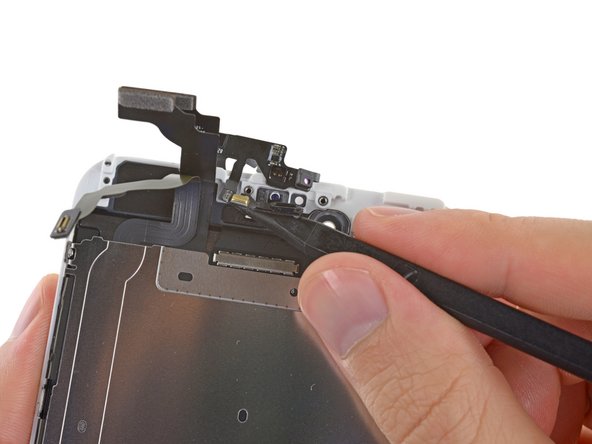
Step 5: Detach connectors

Hidden underneath are four connectors which link the screen to the logic board. Remove them carefully using the plastic spatula.
Step 6: Remove earpiece speaker
* If you bought the item with Spare Parts(Front Camera, Sensor Flex, Shield plate, Earpiece Speaker), no need to do this step.


Step 7: Remove front-facing camera and sensor cable
* If you bought the item with Spare Parts(Front Camera, Sensor Flex, Shield plate, Earpiece Speaker), no need to do this step.

Use the tip of a spudger to gently pry up the sensor cable assembly from its recess in the display assembly.
The cable is held in place with a mild adhesive.

Remove the front-facing camera and sensor cable assembly off the display assembly.
Replacement assemblies may or may not come with the speaker mesh already attached. If it's missing, save your old one and re-use it. You can separate it with some heat from a hair dryer and gentle prying or pulling with tweezers.
Step 8: Remove Home Button

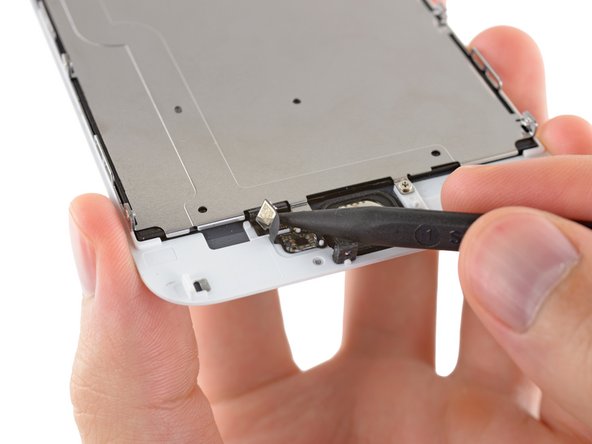

Carefully wedge the tip of a spudger underneath the home button connector cable.
Gently move the spudger across to separate the home button connector cable from the adhesive securing it to the front panel assembly.
If the cable doesn't separate easily, apply heat using an hair dryer to soften the adhesive, and try again. Be careful not to damage the cable.

The rubber gasket surrounding the home button is very thin and tears easily.
Apply mild heat (with an heat gun, or hair dryer) to soften the adhesive securing the home button gasket.
Using your fingertip, gently press up on the home button from the front side of the display assembly. Use firm, constant pressure to slowly separate the home button's rubber gasket from the front panel.
Step 9: Remove the LCD shield plate
* If you bought the item with Spare Parts(Front Camera, Sensor Flex, Shield plate, Earpiece Speaker), no need to do this step.


Remove the Phillips #00 screws securing the LCD shield plate to the front panel

The next step requires peeling one end of the home button cable (highlighted in red in the second picture) that is affixed to the back of the display assembly with strong adhesive. We highly recommend heat the bottom of the display assembly, directly on top of the home button.

Carefully lift—but do not remove—the LCD shield plate by lifting the end nearest the earpiece speaker a few millimeters from the display assembly.
Gently lift the other end (nearest the home button) to peel the home button cable off the display assembly.
Be extremely cautious as you peel the home button cable. It is a fragile cable. If you feel more than slight resistance, we recommend reheating and reusing the iOpener to soften the adhesive.
Remove the LCD shield plate off the display assembly.
Display assembly remains.