
iPhone 5s/SE Screen Replacement
Screen Replacement Guide
- Pentalobe screwdriver
- Phillips screwdriver
- Metal spatula
- Plastic spatula
- Suction cup
Preface
Use the following picture guide to easily change the display on your iPhone 5 and iPhone SE. You should make a backup of your iPhone before changing the display and then turn it off.
Step 1: Remove Pentalobe screws
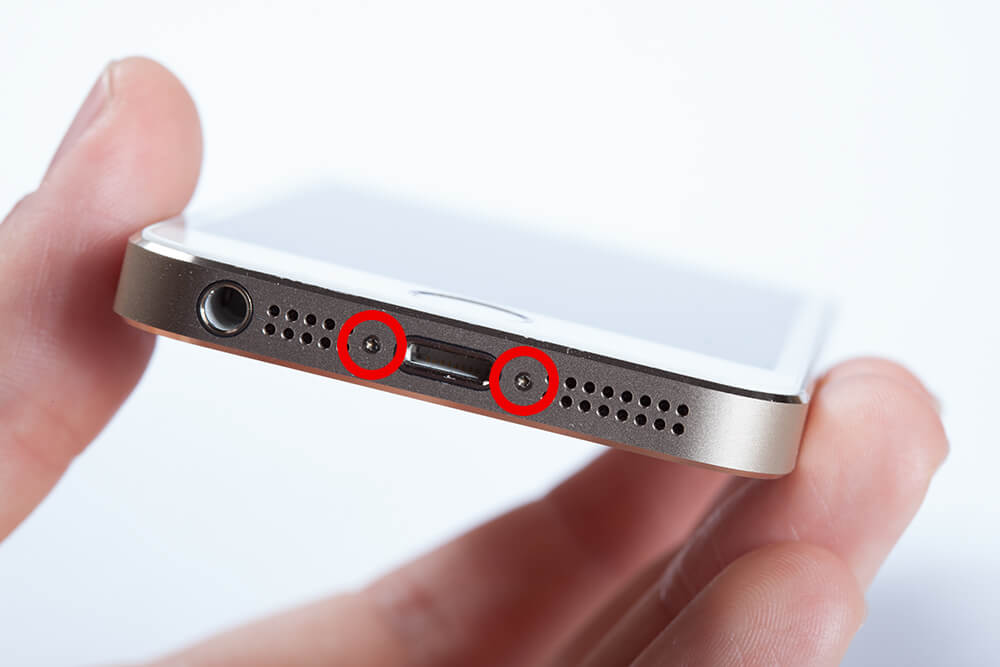
First, remove the two pentalobe screws on the bottom of the iPhone.
Step 2: Lift up screen

Now you make good use of the suction cup or the thin metal spatula in order to lift the screen out of the frame.
Step 3: Detach screen from frame

Drive the plectrum between frame and screen. Be careful not to insert it too far into the device in the area around the home button. Slowly lift up the whole screen assembly.
Step 4: Remove home button clamp

The first thing you see when opening the device is the connection between the home button and the logic board. Remove the little metal clamp securing the connector to the logic board. Use the tip of the plastic spatula to carefully pry it off.
Step 5: Detach home button connector

Now you can disconnect the cable itself. Carefully bend open the screen a little further.
Step 6: Detach cover

Open the screen just enough so you are able to reach these four philips head screws securing the metal cover.
Step 7: Detach connectors

Hidden underneath are three connectors, which link the screen to the logic board. Remove them carefully using the plastic spatula.
Step 8: Remove earpiece speaker
* If you bought the item with Spare Parts(Front Camera, Sensor Flex, Shield plate, Earpiece Speaker), no need to do this step.

Remove the two screws securing the upper component bracket:
It is imperative that the right screws are inserted into their respective holes. Otherwise it may cause severe damage to the LCD during reassembly.

Orient the phone as shown, with the home button on top and the earpiece speaker on bottom.
Gently dislodge the clip, near the bottom left corner of the earpiece speaker bracket, outwards from its recess on the front panel assembly.
Do not pry with excessive force, as the earpiece speaker bracket is fragile and malleable.
With a set of tweezers, shift the bracket to the left to unclip it.

Remove the earpiece speaker with a set of tweezers.
If you use your fingers, be very careful not to touch the gold contacts on the front panel. Finger oil can prevent good contact.
Step 9: Remove front facing camera and sensor cable
* If you bought the item with Spare Parts(Front Camera, Sensor Flex, Shield plate, Earpiece Speaker), no need to do this step.

Using the edge of a set of tweezers or a metal spudger, gently pry the earpiece speaker contact cable up, to separate this portion of the camera and sensor cable from the adhesive below.
Only pry directly under the earpiece speaker contacts—there are sensors and microchips that can be damaged by prying elsewhere.

Use the point of a spudger to lift the ambient light sensor and proximity sensor out of their recess in the display assembly.
There is a small, square plastic and metal holder for the proximity sensor. This holder is essential for the proximity sensor to function correctly.
If replacing the proximity sensor make sure that the holder remains adhered to the back of the display. If it comes off with the old proximity sensor, remove it from the old sensor and use a tiny bit of adhesive to re-attach it to the back of the display.

Use the flat end of a spudger to gently peel the front-facing camera portion of the cable away from the display assembly.
Step 10: Remove home button

Unscrew the single captive Phillips #000 screw securing the home button cable.
The captive screw is fastened to the home button cable by a spring contact backing. During reassembly, ensure the contact is in the correct orientation—on the side of the screw nearest the LCD.
If your replacement part does not have this captive screw and spring contact, you will need to transfer them to the new cable.

Fold the home button cable down, out of the way of the home button bracket.


Wedge the the tip of a spudger underneath the home button cable assembly.
The home button cable is affixed by mild adhesive.
Gently work the spudger underneath the cable to separate the home button cable from the front panel assembly.
Do not remove the home button yet, as it is still attached to the front panel assembly.

If necessary, remove the tape over the home button on the front side of your cracked front panel assembly.
Gently push the top left corner of the home button up away from the front panel.
Do not push the home button all the way through—you only need to get a corner free, so that you can pry it free with a spudger.
This membrane is very thin. If you feel like you're going to tear the button, apply heat and try again.
Step 11: Remove LCD shield plate
* If you bought the item with Spare Parts(Front Camera, Sensor Flex, Shield plate, Earpiece Speaker), no need to do this step.


Remove two 1.2 mm Phillips screws from each side of the LCD frame (four total).
To avoid stripping the final screw, it may be helpful to first slightly loosen all four screws before removing any.
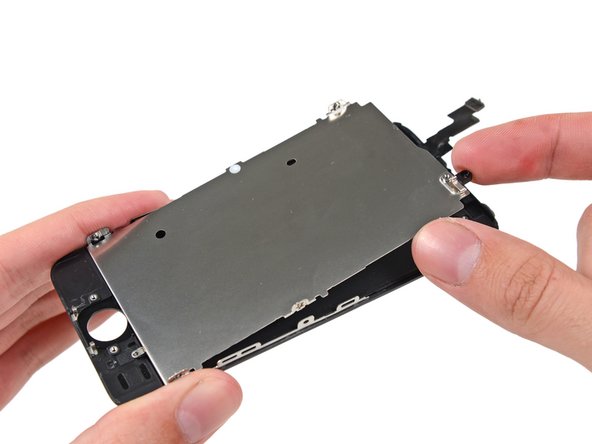
Remove the LCD shield plate from the display assembly.
The LCD and digitizer remains.