
Multilingual Instruction Manual
 |
If you need to browse the electronic version of the English manual, please visit the following link or scan the QR code at the bottom of the page. |

|
Wenn Sie die elektronische Version des deutschen Handbuchs durchsuchen möchten, besuchen Sie bitte den folgenden Link oder scannen Sie den QR-Code unten auf der Seite. |
 |
Si vous avez besoin de parcourir le manuel d'utilisation en français, veuillez visiter le lien suivant ou scanner le code QR en bas de lapage. |
 |
Se hai bisogno di sfogliare il manuale utente in italiano, visita il seguente link o scansiona il codice QR in fondo alla pagina. |
 |
Si necesita consultar el manual de usuario en español, visite el siguiente enlace o escanee el código QR al final de la página. |
 |
日本語のユーザーマニュアルを参照して欲しい場合、次のURLを入力し、 或いは下のQRコードをスキャンしてください。 |

Contents
Introduction and Parameters .......................................................................... 01
Included Contents ........................................................................................... 04
Illustration of How to Use the Smart Cover .................................................... 05
Connect Monitor with Devices ........................................................................ 06
Duplicate & Extend Mode Configuration ......................................................... 10
Supported Devices ......................................................................................... 13
Common Problems and Solutions .................................................................. 17
Notice ............................................................................................................. 18
Introduction and Parameters

01
Introduction and Parameters
3.5 mm Audio Out Port
Compatible with audio devices featuring 3.5 mm interface
Turning Button
A. OSD Menu: Press Turning Button once to enter the OSD menu.
B. Screen Attributes adjustment: Press the Turning Button to select menu item in the OSD menu, and press the Turning Button UP/DOWN to adjust the attributes in the menu.
C. Brightness Adjustment: When out of the OSD menu, press the Turning Button UP once for quick access to Brightness adjustment.
D. Volume Adjustment: When out of the OSD menu, press the Turning Button DOWN once for quick access to Volume adjustment.
Power Button
A. Press and hold down the Power Button for approximately 3 seconds to turn on/off the monitor.
B. When in the OSD menu, press the Power Button to return to the revious page.
Mini HDMI Port
Transmission audio signal and video signal
USB Type-C Function Port
Compatible with USB PD2.0 power supply, supports 5V/9V/12V/15V/20V input.
Support USB-Type C 3.1 reversible insertion and reverse charging.
02
General Specifications
| Panel Type | IPS |
| Resolution | 1920*1080 |
| HD Standard | 1080P (Full HD) |
| Pixel Arrangement | RGB vertical stripe |
| Color Temperature | 6800K |
| Contrast Ratio | 1000:1 |
| Screen Ratio | 16:9 |
| Brightness | 300cd/m² |
| Backlight Type | W-LED |
| Transmissive Mode | Normally black |
| Refresh Rate | 60Hz |
| Input Interface | Mini HD, Type-C Full Function (Video Data, Power Supply ISDN) |
| Output Interface | 3.5mm Audio Interface |
| Speaker | Built-in Speakers |
03
Included Contents

04
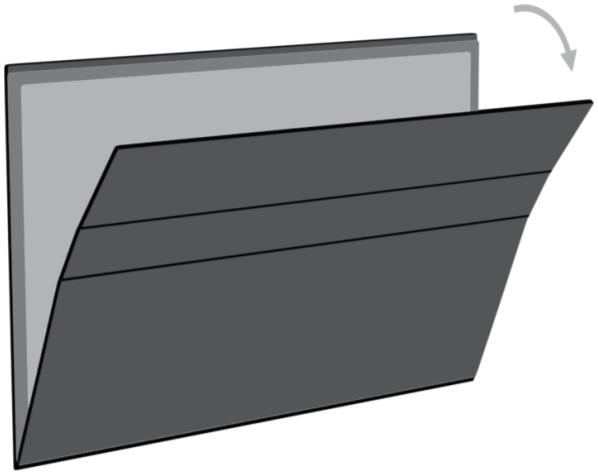
Illustration of How to Use the Smart Cover
You can stand up the monitor by different positions with the smart cover.

05
Connect Monitor with Devices
1.Connection Condition
This monitor does not have an internal battery. Therefore, before connecting the monitor, it was necessary to confirm that it is supplied with sufficient power (5V/2.4A or higher).
2.Laptop (Featuring Type-C)

When you use the Yodoit monitor with your laptop, please pay attention to the following notice. If you wish to adjust the brightness and volume beyond 80%, you need an external power supply of 5V/2.4A or higher.
Additionally, please ensure that your laptop's Type-C port supports audio and video signal transmission, as not all Type-C laptops are compatible with the Yodoit monitor.
06
3.Personal Computer / Laptop (Featuring an HDMI Port)

Note: that HDMI ports do not transmit power. You have to use an extra power supply (5V/2.4A or higher) when using a mini HDMI port connection
07
4.Phone (Featuring Type-C)

In the absence of an external power supply, the Type-C phone will provide power to the monitor. In order to conserve energy, the phone will activate an energy-saving mode that reduces the monitor's brightness to 30% automatically.
If you connect an external power supply, the phone will charge through the power supply. In order to ensure both the monitor and the phone receive sufficient current to operate, we recommend using at least 16W charger or power bank as the external power source.
Please note that only phone with full-featured Type-C port can work with the monitor. If you're using an iPhone, you'll need a lightning to HDMI adaptor to make it work.
08
5.Other Devices

Please ensure a smooth signal transmission by connecting the power supply cable first, followed by the Mini HDMI to HDMI cable. For Nintendo Switch device connections, a power adapter with a minimum output of 30W is required.
09
Duplicate & Extend Mode Configuration
1. Connect your Yodoit monitor to a power outlet and an available port on your PC.
2.Right-click the desktop and choose Display Settings (for Windows 10).

3. Select the additional monitor first for any further settings. If you don’t know which one the portable monitor is, click on “Identify” to distinguish the displays. If you can’t see the additional display listed, please click on “Detect”. If it doesn’t work either, please restart the computer and try the previous steps again.

10
4. Select the "Multiple displays" drop-down menu and then choose either "Extend these displays" or "Duplicate these displays".
5. Tap the “Display orientation” drop-down menu and choose either Landscape or Portrait mode. Note: If the orientation option is not visible on your laptop/PC, please verify if your device supports this function.


Note: For Windows 7/8, Right-click the desktop and select “screen resolution” to change the mode or orientation setting
11
OSD Function Introduction

1. To activate the OSD menu, press the Turning Button.
2. Use the Turning Button to scroll up and down to select your desired settings.
3. Press the Turning Button to confirm your selection.
4. Press the Power Button to return to the previous page.
12
Supported Devices
1. Phone
|
HUAWEI Mate 10/Mate 10 Pro/Mate 20/Mate 20 Pro/Mate 20X/Mate RS/Mate 20 RS/Mate 30/Mate 30 Pro/Mate 30E Pro/Mate 30 RS/Mate 40/Mate 40 Pro/Mate 40 Pro+/Mate 40 Rs/Mate X2/P20/P20 Pro/P20 RS/P30/P30 Pro/P40/P40 Pro/P40 Pro+/P50/P50 Pro |
|
SAMSUNG S8/S8+/S9/S9+/S10/S10+/S10e/S20/S20+/S20 Ultra/S21/S21+/S21 Ultra/Note 8/Note 9/Note 10/Note 10+/Note 20/Note 20 Ultra/Fold1/Fold2/Fold3(Connecting Samsung need extra power supply) |
|
OPPO R17Pro/Reno Series |
|
HONOR Note 10/V20 |
|
Sony XPeria 1(J9110)/Xperia 5/Xperia XZ3 |
|
Razer Note 10/V20 |
13
|
OnePlus OnePlus 7/OnePlus 7 Pro/OnePlus 7T/OnePlus 8/OnePlus 8 Pro |
|
Nokia Nokia 9 PureView |
|
HTC U ultra/U19e |
|
LG G5/G7 |
|
ASUS ROG Phone/ROG Phone II |
|
More To be updated |
14
2. Laptop
|
Apple MacBook12/MacBook 2015/MacBook 2016/MacBook Air2018/MacBook Pro/Ipad Pro/MacBook Pro 2016/MacBook 2017 pro/MacBook Pro 2018/Ipad 2018 |
|
Microsoft Surface Book2/SurfaceGo/Surface Pro7 |
|
Lenovo Yoga 5 Pro/Yoga 6 Pro/ThinKPad X1/Carbon 2017/Mix 720/Y7000/Y7000P/Y9000K/ThinkPad E480/ThinkPad X280/ThinkPad X1/Carbon/Ideapad 720S/ |
|
DELL G3/G5/G7/Inspiron 5000/Inspiron 7000/XPS13 XPS15/Latitude 5285/Latitude 3520 |
|
ASUS ZenBook 3/ZenBook 3 Pro/ZenBook X/U306/U321 Series/U4100/U4100UN/U5100UQ/ROG Series |
|
HP Pavilion X2/Elite Book/Elite Book 1050G1/Folio/G1/HP Spectre13/Envy 13 |
|
HUAWEI MateBook D/MateBook X/MateBook X Pro/Wt-w09/MateBook E/MateBook 13 |
15
|
HONOR Magic Book |
|
ChromeBook/Pixelbook/PixelBook Pen |
|
XIAOMI Mi Air 12.5/Air 13.3/Pro 15.6/Pro 15.6 GTX |
|
ACER Chrome Book 11 |
|
Razer Blade Stealth |
|
More To be updated |
3.Compatible with SWITCH/XBOX/PS3/PS4/PS5 etc
16
Common Problems and Solutions
Problem 1:
What if my laptop doesn't have a USB-C port
- The USB-C to USB-C cord is designed to transmit both power and signal data through a single cable.
- If it doesn't work for your laptop, kindly make use of the HDMI cord and the USB-A to USB-C cord combination.
- Please note that the HDMI cord is responsible for transmitting data, while the USB-A to USB-C cord will handle power transmission to power up the device.
Problem 2:
The "No signal" issue persists over time
- Check whether the wires are loose or not. If they are, please replug them and make sure that they are connected correctly.
- Try replacing the cable with a new one and see if the problem persists.
- If none of the above steps resolves the issue, please do feel free to contact our after-sales support team via email for further assistance.
Problem 3:
The monitor flickers from time to time
- Check if the connection is loose.
- If not, the issue could be due to an insufficient power supply. Connect the adapter for a sufficient power supply.
- If the issue remains, consider using a new power adapter or data cable.
Problem 4:
My monitor is not turning on
If the monitor isn’t connected to a USB-C Cord, ensure that both HDMI and USB-A to USB-C cords are connected to the monitor. Then long press the power button to turn on the monitor.
17
Common Problems and Solutions
Problem 5:
USB Type-C port connected, but no image on the display
- The monitor only works with devices that have a full-featured USB Type-C port supporting audio and video signal transmission, which means the device should be compatible with the USB Type-C DisplayPort Protocol.
- If your device doesn’t support the USB Type-C DP function, please consider using an adapter that supports the DisplayLink function. However, it’s not recommended as it may result in poor image quality.
Problem 6:
The monitor can’t be shut down
- Long press the "Menu" key on the left to shut it down
Notice
To use the USB Type-C Portable Monitor safely, please:
- Read the documentation provided before setting it up.
- Keep it away from rain or moisture to avoid fire or shock hazards.
- Never open the cabinet or spill liquid into the slots.
- Ensure cables are connected properly and power cables are undamaged.
- Place it on a stable surface and away from dust, humidity, and extreme temperatures.
- Contact tech support at pmsupport@yodoit.com for help, if you have ever encountered any problems.
18
