

Need to clear some storage on your phone? Can't take a photo, or install the app you want? Follow these easy-to-follow space-saving tips for iPhone and iPad owners

Storage shortage is a reality for many iPhone owners: whether the culprit is apps, music, Messages or (most commonly) photos and videos, most of us have run out of space at a key moment. Perhaps just as you are trying to update the operating system, or as you were trying to take photographs of a momentous occasion.
Unfortunately you can’t upgrade an iPhone’s internal storage. But don’t worry: help is at hand. In this article we share our top tips for managing and optimising the storage available on your iPhone, getting the most out of every last megabyte and freeing up space for new apps and photos.
As an aside, please note that even though you can’t upgrade the internal storage, you can supplement an iPhone’s capacity with external storage accessories and you can use iCloud storage to extend your capacity to 2TB; it’s also worth reading our wider-ranging tips on how to increase iPhone storage through various means.
1. Find out what is taking up space and delete the biggest culprits

The first thing to do is find out what is taking up the space on your iPhone. Luckily there is a simple way to do this.
1. Open Settings and go to General.
2. Tap on iPhone Storage.
3. This will take you to a screen where you can see what is taking up the space on your iPhone. There will be a bar chart divided up into Photos, Apps, system data, and other types of files. Older iPhone operating systems also showed mysterious Other storage here, which could often run to tens of GB of storage, leaving many to wonder how to delete Other storage on the iPhone.
4. There are various storage management options that we will come back to, but if you scroll down you will see which of your apps are taking up the most space.
In our case Photos was using more than 73GB, Messages nearly 20GB. There are ways to manage these apps and how much they store that we will discuss below.
If you scroll through the various apps taking up space (they are sorted so that the largest are at the top) you will be able to quickly locate the ones that are worth removing. The figures include media, so expect your Photos and Music apps to be near the top.
This view also shows when you last used an app, so you can confidently delete an app you probably won’t use any time soon. Don’t worry – once you’ve bought something it’s tied to your Apple ID so Apple knows you own it and you’ll be able to download it again.
Scroll through the list and be brutal. If an app you rarely use is taking up 300MB of space then delete it – you can always download it again for free if you want to.
1. Find an app you want to delete.
2. Swipe from right to left on it.
3. Choose Delete App.
There’s another way to delete apps that we will discuss next.
2. Delete apps from the Home screen

As we explained above, it’s easy to locate apps that take up a lot of space by going to the iPhone Storage section of Settings > General and then working through the list of apps there, which are sorted by size and also show the date when you last used them.
Once you have found an app you want to delete on this screen you can swipe from right to left on it and then choose Delete App.
There is another way to delete apps that might be slightly quicker if you just want to free up some space in a hurry. You can delete an app from the Home screen.
How this works depends on the version of iOS you are using.
1. In the most recent iOS versions, press and hold on an icon until the menu comes up.
2. Then press Remove App.
3. You’ll then see a window pop up to confirm you want to delete the app.
4. Choose Delete App to remove it from your iPhone.
On older versions of iOS you could tap and hold on its icon and wait for it (and the other icons too) to start jiggling about – this means you’re in Edit Mode. Then tap on the X in the left corner to delete the app.
There is more advice about deleting apps here: How to delete apps on iPhone & iPad.
3. Work through Apple’s recommendations

When you’re in Settings > General > iPhone Storage, you’ll see some recommendations for optimizing your storage (above the list of apps). You will probably see a default of two, Tap Show All or More to see more of this sort of thing.
The reason why we didn’t start with this is that although a great way to manage storage in the future, it’s not the quickest way to recover a bit of storage in a hurry. However, it will stand you in good stead if you take Apple’s advice and put the various storage management suggestions into play.
One option you will see here (if you haven’t already set it up) is to use iCloud Photo Library. This will store your photos and videos in the cloud. iCloud Photo Library is a great solution if you want to have access to all your photos on all your devices – just make sure that Apple stores optimized versions of the photos. (We will discuss iCloud Photo Library in more detail below so that you don’t fall into that trap).
Another option is to Auto Delete Old Conversations from the Messages app. We haven’t done this primarily because we don’t want to lose access to old messages from people long gone, but it’s a great way to reduce the amount of storage given to messages. We could save a massive 17GB if we did this.
You could also choose to Review Downloaded Videos. If it’s an option for you tap on the arrow beside it and delete any downloads you see here that you don’t need to keep.
You may also see the to Offload Unused Apps. Here Apple volunteers to automatically offload app that are rarely used when you start to run out of storage. ‘Offloading’ deletes the app itself – which is easy to replace by redownloading, after all – but keeps the documents and data, which are likely to be irreplaceable. You can also find the option to Offload Unused Apps under Settings > App Store. Make sure that Automatic app downloads is deselected here too so that apps don’e automatically download when you add them to other devices.
iOS will tell you how much storage you stand to gain from enabling these suggestions.
4. Delete app data and cache

Apple offers to remove the app while preserving the data, but perhaps it’s the data you want to delete. Maybe you have old videos and books you no longer plan to watch taking up space in an app you still want to use. Some apps will have a lot of data associated with them that you could delete without having to remove the app itself.
To look deeper into the storage being taken up by apps, return to Settings > General > iPhone Storage and click on the arrow beside one of the apps listed there. This way you can see how much data is used by the app itself, and how much additional space is being used by documents and data.
Video apps tend to be a big culprit here, but the Review Downloaded Videos above should have solved that for you. Another place to look is your video editing apps, and book reading apps like Kindle and Books.
To delete the data you will need to go to the app itself. We’ll walk through how to delete data from a number of apps below including Books, Notes and Messages. Other places to look include:
- Google Maps: Go to Saved and then look at Maps to see Maps data you have previously downloaded that you could delete.
- Prime Video/Netflix/Disney+ etc: Open the app and click to view your downloads. You should be able to select the ones you wish to delete.
Another way to free up space is to clear your browser cache. To delete Safari cache follow these steps:
- Open Settings.
- Scroll down and click on Safari.
- Click on Clear History and Website Data.
If you use Chrome you have to remove the cache from inside Chrome. IN that case follow these steps:
- Open Chrome.
- Tap on Options.
- Tap Settings.
- Tap Privacy.
- Now tap on Clear Browser Data.
- Select what you want to delete.
- Tap Clear Browsing Data.
5. Delete text messages
As we mentioned above, you could choose to auto-delete conversations from the Messages app, which would free up a lot of space. But you might not want to do that if you have messages you want to keep for sentimental reasons.
You can still delete, on mass, a lot of the Messages on your phone while keeping the ones you don’t want to lose.
- Swipe from right to left on any message that you want to delete.
- Choose Delete.
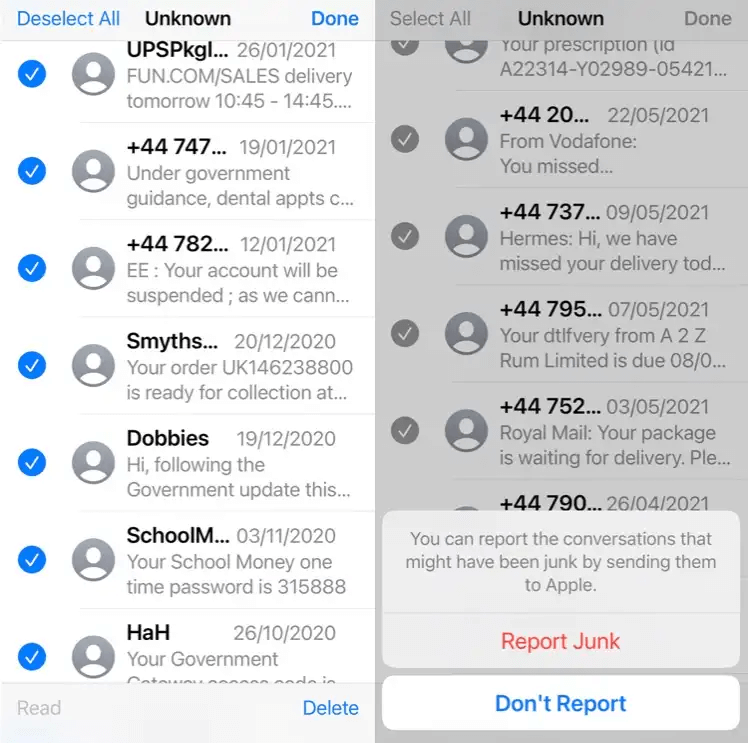
A better way to filter out messages that are safe to delete and then mass delete them is to filter your messages by Unknown Senders.
- Click on Unknown Senders.
- Once in the Unknown Senders view tap on the three dots at the top.
- Choose Select Messages.
- Tap on Select all.
- Double-check that you aren’t deleting anything you might need. Deselect those messages.
- Tap Delete.
If you don’t have any reason to keep messages you have two choices. You can delete messages over a year old or you can delete messages that are just 30 days old. To do this follow these steps:
- Open Settings.
- Scroll to Messages and tap.
- Scroll to Message History and tap on Keep Messages.
- Now choose between 30 days, 1 Year, and Forever.
6. Delete photos you don’t need

If your photos are taking up a considerable amount of space on your iPhone you might want to consider deleting a few of the ones that you have no desire to keep.
Perhaps, like us, you often take screenshots of train times when you are commuting. If you want to delete screenshots from your phone you can do so really easily by opening the Photos app and going to Albums > Screenshots > Select > Select All (assuming you want to delete the lot, otherwise just select the ones you wish to delete).
Or you take a ton of photos just to get the perfect shot. There is no need to keep these shots. We try to get into the habit of deleting these extra shots close to the time we take them, or at least favoriting one of the collections so we can easily go back and delete lots at a later date.
(If you’re not in this sensible habit, a free app may be able to help. See How to delete duplicate photos on iPhone.) We’ve tried a free option called Remo Duplicate Photos Remover, but there are plenty more you can try such as the paid-for Duplicate Photos Fixer.
Similarly, if you’ve been using Burst Mode you may have hundreds of identical images you really don’t need taking up space on your iPhone.
To remove extra shots from Burst Mode find the Bursts folder, tap on the image shown, choose Select, select the image (or images) you wish to keep, tap Done, and then choose to Keep only one favorite.
Speaking of Burst Mode…
When you’re taking a photo, you can hold down the shutter for slightly longer than normal and the camera will take a series of rapid shots. This is Burst mode. It’s great for getting the absolute best action shot, but it does make for a lot of photos to get rid of afterward, and is easy to activate by mistake.
Unfortunately, it’s not possible at present to turn off Burst Mode. This has frustrated a lot of people – some complain that their photos are now blurry because they have less control of the shutter, others find that burst mode quickly fills up the storage they have available.
We suggest that rather than tapping on the shutter button on the screen you use the volume control buttons on the side of your phone to take the photo, as it’s easier to do a single tap that way.
To simplify this process you could turn to an app. We recommend the following:
Gemini Photos
Gemini Photos is an app that will help you remove duplicate photos from your Photo library. The app scans your library to identify images that you can remove. It will sort them into Notes, Blurred, Similar and Screenshots. You can then choose to delete them all, or select the ones you want to delete.
In the case of Similar, it will identify the images that are similar and select the best one for you to keep – of course you can review this.
You can download Gemini Photos from the App Store.
7. Delete images from Messages

Another way to save a ton of space on your iPhone is to delete images that have been shared via Messages. Again you might have images here you want to keep for sentimental reasons, so beware.
This is a good option if you don’t want to mass delete a lot of images, as you can free up space by just deleting the space-hogging images and other media associated with iMessages.
1. Open a conversation.
2. Tap and hold an image within the thread. You’ll see the reaction icons – heart, thumbs up and so on – above the image, but at the bottom, there’s a further menu.
3. Tap More, and you’ll see little circles next to each message and image. (The one you tapped and held will have this pre-ticked.)
4. You can now select as many images (or other files) as you wish, then tap the bin icon at the bottom left to delete them.
If there are likely to be a few images you want to delete you might want to go straight to the images library associated with that message. To do this follow these steps:
1. Click on the name or group at the top of the message.
2. Now scroll down the page to the Photos section.
3. Tap on See All.
4. Now tap Select.
5. You can tap on any images you want to delete now.
6. Once they are deleted tap on Delete.
You can also show just Screenshots, which might help you filter out the things you are most likely to want to delete. Unfortunately, you can’t select all here though.
8. Beware of iCloud Photo Library

We mentioned iCloud Photo Library above. It’s a useful service that lets you automatically upload and store your entire library in iCloud to access photos and videos on all your devices.
This might sound like the solution to your problems if you have limited space on your iPhone or iPad, but hold your horses!
The problem with iCloud Photo Library is that it will store all your images taken on all your devices on your iPhone (and all your other devices). These are stored in reduced file size, but they are still going to be taking up space on your iPhone.
So rather than solving your problem, you might actually be adding to it!
If you’re looking for a way to back up the images on your iPhone, iCloud Photo Library is not it because you cannot delete the images from your iPhone because once they are in iCloud deleting any image will delete it from all your devices.
We have a separate article on backing up your Apple photo library and we recommend you read that for tips.
9. Turn off Photo Stream

If you’ve got Photo Stream turned on you will see photos you have taken on your iPhone or iPad, and those you have uploaded to your Mac from your camera. These images aren’t full resolution, but are still likely to take up a lot of space on your iPhone. If you could really do with that extra space then turn off Photo Stream.
Go to Settings > Photos (or Photos & Camera in older versions of iOS) and deselect My Photo Stream. This will delete your Photo Stream from your iPhone.
Unfortunately, it also means that your iPhone photos are no longer uploaded to your Photo Stream on your other devices. You can always turn it back on again after the storage issue has passed.
10. Don’t join other people’s Photo Streams

You can create and share photo streams with other people. This is a nice way to share images of events you attended with friends, or pictures of grandchildren with grandparents, but beware that if you join someone else’s photostream it may quickly fill up your iPhone.
Make sure you’ve got iCloud Photo Sharing turned off in Settings > Photos.
If you have some images in an album you’re sharing in iCloud Photo Sharing that you don’t want to appear on your iPhone you can delete them. Go to the top of those images and click on the name of that particular album to see the whole album.
Next, click on Select, and select the items you want to delete (you don’t have to tap on each if there are a lot, you can just swipe your finger around the screen to select them).
Once you have done so, tap on Delete XX Photos. Warning: this will delete the photos from the subscribers’ devices too, so if you think that might upset them don’t do it!
11. The movie rental trick

This tip can create space on your iPhone (from 1/2MB to over 1GB sometimes) using magic. Not really, but we’re not quite sure how it’s done, only that it works if your iPhone is almost at maximum capacity. And no, your iPhone doesn’t need to be jailbroken, nor does it void the warranty.
Before we begin, head to Settings > General > About and make a note of how much storage you have.
Then, head to the TV app and find a large title – we recommend The Lord of the Rings: The Two Towers at a whopping 6.83GB. Once you’ve found a suitable movie, tap the Rent button twice (don’t worry, you won’t actually end up renting it) and dismiss the popup informing you that there’s not enough space to download the movie.
Now, head back to the About section of the Settings menu and take a look at your available storage. If all has gone well, you should see a difference of a few hundred megabytes, possibly more. While it won’t work for everybody, users on Reddit report that following the steps several times allowed them to keep freeing up more storage.
We’re not quite sure what Apple is deleting when it does this, as it’s not apps, photos or other important data – instead, we assume it’ll be clearing out caches and other areas that make up the “Other” section on your iOS storage breakdown.
12. Sign up for iTunes Match or Apple Music

You don’t have to store every Music track you could ever possibly need to listen to on your iPhone. If you sign up for iTunes Match (for $24.99/£21.99 a year) or Apple Music ($10.99/£10.99 a month) and you will then have every track you own available to you via the cloud.
Therefore you can delete your music from your iPhone knowing that every song you may wish to listen to is but a download away. Here’s how to sign up for iTunes Match and here’s our guide to Apple Music.
Once you have signed up for either of these Apple’s services, all your music on all your Apple devices will be uploaded to iCloud (even tracks you have imported from CD). This means you can download any track you fancy listening to on your iPhone whenever the mood takes you.
You can download a track or a whole album, or a whole playlist. Just click on the iCloud download icon.
If you then want to delete the track from your iPhone, just swipe left on it, to delete. It will still be available to download from iCloud another time.
13. Remove Books you’re not reading

Have you got any iBooks downloaded on your iPhone? Do you need them to be there? If you delete them they will still be available in iCloud to download again, so why not save yourself a few MB by removing the novel you’re reading on your iPad from your iPhone.
Our Books app is 35.5MB but carries 1.65GB of data.
Using the Books example, to delete the data you need to open the Books app.
1. Open Books.
2. Go to Library.
3. Tap on Edit.
4. Look through the books on your device – any that aren’t currently stored on the iPhone will have a cloud logo beside them.
5. Now tap on any book you wish to remove from your device.
6. Then tap on the Trash in the bottom left to delete it.
7. Tap on Remove Downloads to remove it from your device.
You can choose to Delete This Copy, rather than delete it from all your devices.
Also, check Settings > Books and make sure you deselect Automatic Downloads so that when you buy a book on another device it doesn’t automatically download to your iPhone too.
14. Record video at a lower resolution

Newer iPhones offer you the option to reduce the quality of the videos you record.
As the screenshot shows, a minute of video can take up 400MB of space on your iPhone if you record it at 4K, so you probably won’t want to be doing that.
The iPhone should default to 1080p HD at 60 fps, but you could economize further by recording at 720p HD and 30fps: just 40MB for a minute, rather than 90MB.
You can change the settings in Settings > Camera > Record Video.
15. Check your photo-editing apps

There are photo-editing features in Photos, but you may use separate apps for photo editing. Those apps could have some old images lurking within that you could delete.
We had 13.9MB worth of data in Camera+ so we loaded up the app and deleted the images in our Lightbox that we no longer needed – after all, we had already saved those ones we had edited to our camera roll.
Check apps like Instagram and the like for images stored in the app itself.
16. Spring-clean your Notes

If you use your iPhone’s Notes app fairly heavily you may be wondering how much space you could save by deleting old notes.
To see how much storage the app is taking up, go to Settings > General > iPhone Storage, then find and tap on the entry for Notes. This will show separate entries for the app itself (a paltry 12MB) and the documents and data it holds (a slightly less paltry 64.2MB, in our case).
To be honest this still isn’t a massive number, and it’s unlikely to make a huge difference. We deleted a fair few notes and didn’t notice any change at all in our phone memory; it doesn’t strike us as worth the effort.
But if you’re desperate (and prepared to be drastic), or if you use Notes to store attachments and other media, then it may make a crucial difference.
17. Get enough space for a photograph

Let’s say you’re suddenly confronted with a fantastic photo opportunity, but the Camera app says there isn’t enough space to take any more photos – and you haven’t got time to start laboriously deleting things.
But if you open another of your camera applications (such as ProCamera, for example), you may be able to take a few shots that you wouldn’t be able to otherwise. This is because different apps have access to different parts of the phone’s storage/memory. Try it – you never know.
18. Optimize storage using a third-party app

If the free tips above aren’t for you, there are myriad third-party apps available that’ll make the process simpler and quicker. Here one of our top suggestions:
iMyFone Umate
This is an app for Mac and Windows that can free up a huge amount of space on your iPhone.
Plug in your iPhone and run a scan. The app will tell you how much free space you could potentially gain by clearing out temporary and junk files, backing up photos, and deleting large files, then showcases your app collection for rapid (but selective) deletion.
Interestingly, the app offers the ability to compress your photos instead of completely deleting them. It backs the original photos up to your Mac or PC, then will compress your entire library to free up extra space (up to 75 percent, according to the company).
You can grab a trial of iMyFone Umate for free, or you can pay $19.95 (around £15) for the full app.